Sunday, March 31, 2019

Burning Amp 1

To get warm and comfortable on long winter evenings, in the end of 2010 I built myself a Burning Amplifier 1. With its 300W quiescent dissipation and ineffable ((c) Nelson Pass) sound, it is a nice winter time companion.

The enclosure, heatsinks and fans, power supply and speaker protection were salvaged from  my previous (not documented and hence not posted) attempt to build a Krell KSA-50 clone. The Krell clone worked but sounded strange, and I did not have the skills at the time to make it right.

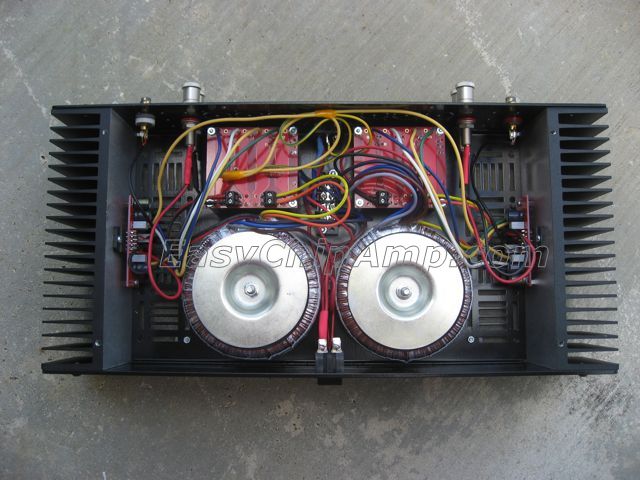
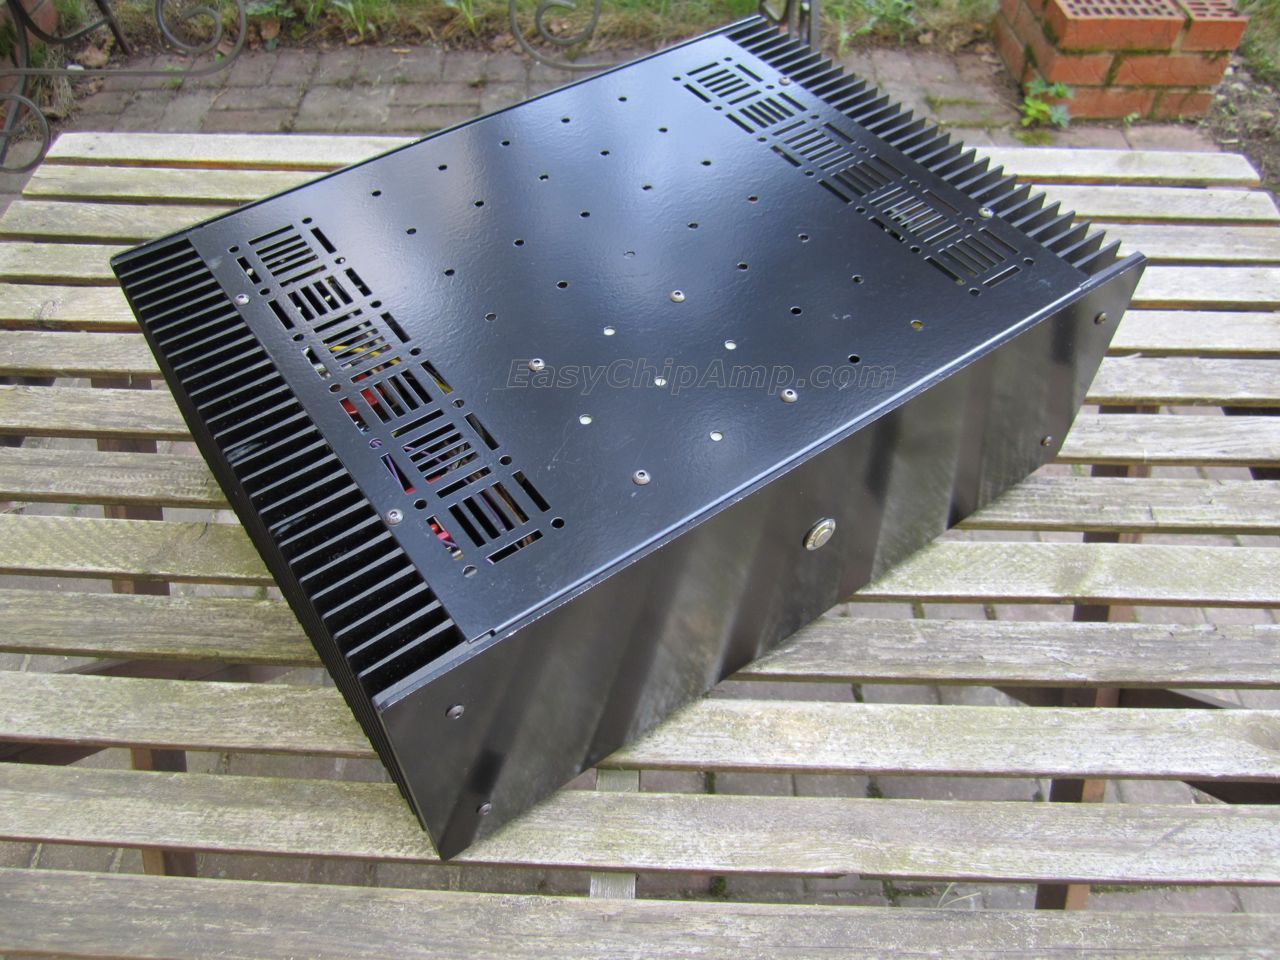
I used four heatsinks, each holding two IRF250 MOSFETs in TO-3 packages and a PCB. Each pair of heatsinks is cooled by a quiet 140mm fan. Power supply uses a 400W toroidal transformer and 2x40,000 uF per channel; it is a dual mono configuration. The amplifier is housed in a 5U 400mm deep enclosure from modushop. Their "pierced" (perforated) base plate was very handy to keep all the parts together without sacrificing the looks. Total weight is about 50 pounds.

The knob on the front panel was designed as volume control, but it looked ugly, so I later remove it and replaced with a ON/OFF button.


Saturday, March 30, 2019

LME49830 + 2SK1530 + 2SJ201

This was an implementation of National Semiconductor's reference design for LME49830 (now obsolete) with two matched pairs of Toshiba's 2SK1530+2SJ201 (also obsolete) per channel. As National Semiconductor in 2011 became part of Texas Instruments, this became a truly obsolete build.

The design is documented in two National Semiconductor's application notes, AN1849 for the power supply and AN1850 for the amplifier - the latter is unavailable from TI. The PCBs were made using National's gerbers for the amplifier and the power supply, thus National's logos.

The amp sounds surprisingly good, so good that I rebuilt is as a pair of monoblocks, each delivering healthy 200W into 8 ohms. It now looks much tidier; I will post the pictures of the monoblocks later.


Yet another Gainclone

This was unavoidable, I guess. Dual mono LM3886 kit from ChipAmp.com (the site is down) with Avel Lindberg's transformers in a wonderfully compact enclosure from Design Build Listen. I liked the simplicity but not the sound.

However, this project started the whole line of exploration of how implementation of opamp circuits affects the audible and measurable performance of those circuits and eventually led to HiFiOcean. I now make and offer Gainclone boards that sound and measure much better.


Thursday, March 28, 2019

Lm60 from AmpsLAB

In 2009, I got an Lm60 kit from AmpsLAB (they sell Mk2 now). The enclosure is from Design Build Listen, power supply is from Hypex (not sold anymore). Each channel is built on a relatively small (120x60mm) one-sided PCB and uses one 2SK1058+2SJ162 pair in the output stage. With proper biasing, the sound is good, esp. for such a simple and compact design. I should have started with this one, rather than with the (equally inexpensive) K-8LS.


Digital Audio Signal Generator

This handy instrument is a version of the design published in the Australian Silicon Chip magazine (a subscription is required to view the details of the article).

It is based on a dsPIC33 microcontroller, has TOSLINK and S/PDIF digital outputs (44.1k, 48k and 96k sample rates) and a stereo analog output. Output frequency, phase, attenuation, and other parameters are set by the keyboard. It produces sine, square, triangle, and sawtooth waves and has a variety of modes. It can be powered by an external DC source or a battery. The article claims low distortion for sinewave (less than 0.06%) and even lower with a good external DAC, but I did not verify that.

Highly recommended.


Creek with a tweak

One of the more interesting projects for me was building a tweaked clone of Creek 4330.

It was designed for Creek by diyAudio member x-pro; the schematic is available on his web site. The tweak was the topic of x-pro's paper and was discussed on diyAudio.com. In 2009, this design generated enough interest on one of Russian DIY forums for a group buy of PCBs and some components.

I used a PCB from that group buy, a compact chassis from modushop, and a K4700 speaker protection kit from Velleman. I was very pleased with the result. Thank you x-pro for sharing the design!


CMoy and PPA

Of course I built the ubiquitous CMoy. It added headphone capability to where it did not exist and surprisingly, it was a big improvement over various built-in headphone amps.

Encouraged, I built the PPA project with a Young-Jung power supply (from the same source, but now discontinued). The enclosures for both the amplifier and its power supply are from modushop.

On first power-on the amp oscillated at 12 MHz when connected to headphones. The oscillation was inaudible but clearly visible on a scope. A quick look at head-fi.org showed that PPA instability is not a new problem. I reduced the value of R11 (see PPA's schematic), which eliminated the oscillation and improved the sound. I replaced the recommended OPA627 with LME49710.

PPA is positioned as a high-end DIY headphone amp, and it is in this project that I felt how subjective "high-end" is. PPA is a nice amp, but a Musical Fidelity X-CANv8 simply blows it away.


Wednesday, March 27, 2019

BantamDAC

ezDAC (see my previous post) lacked an USB input, so I leveraged my newly acquired SMD soldering skills building BantamDAC from a kit. The DAC ended up inside my version of Pete Millett's low-voltage hybrid headphone amp, to be posted separately.

Jason Stoddard of Schiit Audio wrote: "[R]emember, this is early 2011 we’re talking about. Adaptive USB 1.1 was kinda the de facto “good solution”, with most audio components using the truly terrifying TI USB input receiver/DAC/headphone amplifier/car washer chips that weren’t even adaptive. "

Yes, BantamDAC uses one of those TI USB input receiver/DAC/headphone amplifier chips. The choice of the chip puts limits the DAC to USB Audio Class 1 up to 16bit/48kHz. It was ok for 2010; today I'd look for a higher fidelity solution though. 


Tuesday, March 26, 2019

ezDAC

In 2010, having built power amps, speakers and a preamp I wanted to try my hand in digital sources and built a version of ezDAC, (pronounced 'easy-DAC'), a nice do-it-yourself 24bit/96kHz upsampling audio D/A converter, designed by Evan from ezDIYaudio.com (the site is now something else, unfortunately). It is a fairly simple DAC with a CS8416 digital receiver, an AD1896 sampling rate converter, and a PCM1794A with a passive I/V converter for the DAC proper. Nothing fancy.

If was a first for me in many ways, including my first digital audio product I built from scratch, my first use of Eagle to re-create ezDAC's PCB, and my first SMD soldering experience. As Nelson Pass said, the water is fine.

I used three separate 3VA toroidal transformers (for digital circuits, the DAC, and opamps) in the PSU. The enclosure is from modushop.

Eagle files for the PCB are available.


Monday, March 25, 2019

Elekit TU-879S

Elekit TU-879S is the best sounding kit I have ever built. With my Fostex BK-20 DIY full range speakers I mentioned a couple of posts earlier, the sound is fantastic.

If you are not into single ended output, low power tube amplifiers, this amplifier may totally turn around your views on music reproduction. It is a classic two stage amplifier with a triode in the first stage and a power beam tetrode in the second with a global negative feedback applied to the cathode of the triode. Many variants of this circuit are available online, as are many suspicious implementations. When built from scratch, it can be sensitive to the layout and wiring and tricky to properly adjust (it will work but may not show its full potential), but thankfully the kit takes this difficulty away.

Sadly, the kit is now out of production, although TubeDepot says there is an alternative.

(better pictures to be posted later)


First Watt B1 clones

What to say... B1 is a great design by Nelson Pass. Easy to build, absolutely transparent to the sound, compact, PCBs are available. I built several, using both PCBs from PasDIY and my own, made from Nelson Pass' gerbers, in various enclosures. Below are two builds: one with a relay selector (gerbers are available, although in hindsight, six inputs are way too many; three would be enough), the other in a slim 1U enclosure. Both use high quality Goldpoint level controls.


Sunday, March 24, 2019

ZenV4, take four (ZenV4-J+CLC)

My first solid state amplifier build, in 2009, was the Penultimate Zen, aka Zen Variations Part 4, aka ZenV4. It was built with the parts I could find back then, without knowing where to look. It ended up big, heavy with two 400VA toroidal transformers, ugly inside with some electrical tape here and there, without proper grounding, etc., etc. I was as disappointed with the sound as my wife was disappointed with that heavy black metal brick gathering dust.

My first mod was to rebuild the power supply. I threw away one of the toroids, added a softstart circuit from Hypex, and put in a CRC filter with some Mundorf HC caps. One power supply for two single ended channels forced me to learn about grounding and add input transformers and balanced inputs. The sound improvement was there, but it was almost negligible. Oops.

My second mod was to replace the only important MOSFET in ZenV4 with a power JFET from Semisouth (now, sadly, defunct). I actually rebuilt each PCB with the best parts I could find - Nichicon FGs and KGs, 715P Orange Drops, etc. The sound with the JFET got a BIG improvement! The measurements confirmed that, too - I reported on that earlier in this blog.

My third mod was again in the power supply. I replaced the 400VA 2x18V toroid with a 500VA 2x36V R-core, so that I can again enjoy separate supplies for each channel and remove the input transformers. The new transformer is heavy and sits in the middle of the chassis, so I added a separate foot to support it, hoping it may also help with the sonics.

More importantly, I replaced a single CRC filter with two CLCs, one per channel, each consisting of two 22000uF Mundorf HC caps separated by a 10mH/5A Hammond 159ZJ choke. My simulation with PSUD2 promised a substantial decrease in the post-filter ripple, which I did not believe I need, as the filter is followed by a voltage regulator anyway. Nevertheless, I had the chokes and had fun cramming them into the enclosure.

With the new PSU, the bass improved vastly, and the spatial definition of the modded ZenV4 was much better than I can remember from any of my amps. I suddenly realized that I hear the details I've never been aware of in these familiar recordings. I found myself listening to the music, although my intention was to listen to the amp.

The system was the Audio Analogue Crescendo CD player, a First Watt B1 clone, the ZenV4, and a pair of vintage Celestion DITTON XR 15's.